


Still wondering what to make for Christmas dinner this weekend? Here are SIX recipes you've got to try to create the beautiful spread below (including dessert, not in the photo). Whether you'd like to pick and choose certain dishes or do the whole shebang, any and all of these dishes will be loved by your guests!

Appetizer: Smoked Bacon Cheddar Cheeseball Recipe
Ingredients:
- 1 8 oz brick Cream Cheese (chilled)
- 3 tbsps. Sour Cream
- 2 tbsps. Kosmos Q Honey Chipotle Killer Bee
- ⅔ cup Bacon Bits
- ⅔ cup Doritos Dinamita Flamin Hot Queso (crushed)
- 1 ¼ cup Cheddar Cheese (grated for divided use)
- ½ cup Pepper Jack Cheese (grated)
- 1 Jalapeno (minced with seeds removed)
- ⅓ cup Green Onions (chopped for divided use)
- Olive Oil

Directions:
STEP 1: Preheat your favourite smoker to 225°F - we used the Traeger Ranger. We also recommend you use Cherry, Apple, or Hickory pellets/wood chips that you can find by clicking here.
STEP 2: Score your brick of cream cheese on the top to create a diamond pattern, like this:

STEP 3: Coat the brick of cream cheese in oil, then liberally apply Kosmos Q Honey Chipotle Killer Bee seasoning until its well coated.


STEP 4: Next, place your brick onto a small tin foil square and onto the warming rack or top shelf of your cooker, so that it smokes nice and slow.

STEP 5: Smoke the cream cheese for 2 hours at 225°F. Make sure you don't raise your heat too high because you’re looking for your cream cheese to keep its shape. A little jiggle, like a holly jolly Saint Nick, rather than a sad melted Frosty the Snowman.

STEP 6: Pull cream cheese off the smoker and let sit for 5 mins.
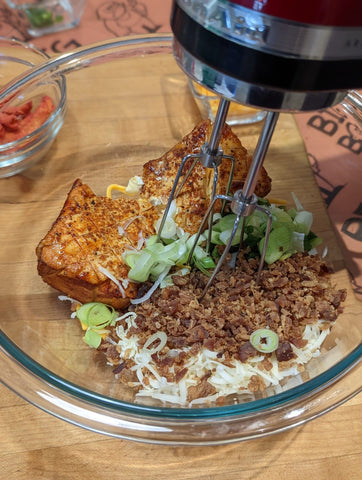
STEP 7: In a large bowl, combine the smoked cream cheese, sour cream, 1 cup shredded cheddar cheese, the jack cheese, minced jalapenos, ⅔ of the bacon bits, and ⅔ of the green onion.

STEP 8: To form the cheese ball, lay out two sheets of plastic wrap and dump the cream cheese mixture in the center of the wrap. Shape into a ball with the plastic wrap and press firmly to compact and solidify the mixture.

STEP 9: Refrigerate the cheese ball for at least 2-3 hours or overnight, whichever is most convenient for the chef.
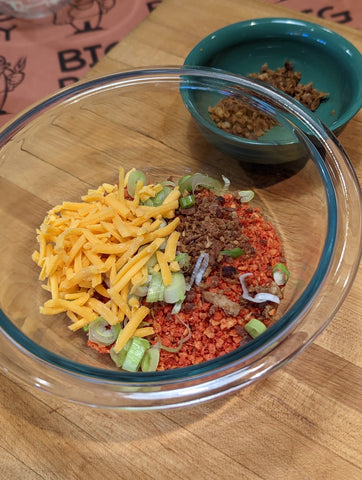
STEP 10: Now, it's time to make the Doritos mixture. In a small bowl, combine the crushed Doritos, remaining bacon bits, remaining shredded cheddar cheese, and remaining green onions. Cover the bowl with plastic wrap. Store in fridge until ready to use.


STEP 11: Now that the cream cheese cheeseball is cold, it's time to finish it. Pull out the cheeseball and spread the Doritos mixture out onto a baking sheet or parchment paper.

STEP 12: Roll the smoked cream cheese ball in the mixture until completely coated, using your hands to press the mixture into the outside of the ball, so that it sticks.


STEP 13: Serve immediately or wrap lightly in plastic wrap and refrigerate until ready to serve. It's best eaten with a variety of your favourite crackers.

Main Dish: Brisket Recipe
Ingredients:
- 1 12-14 lb AAA Brisket
- 6 tbsps. House of Q Slow Smoke Gold (or more if needed to cover both sides)
- Motley Que Beef Fixx
- Killer Hogs - The BBQ Rub
- Heath Riles Pecan Rub
- ¼ cup Beef Broth

Ingredients for Brisket Injection:
- 1 ½ cup Beef Broth (30% less sodium)
- ½ cup Apple Juice
- 4 tbsp Worcestershire
- 2 tbsp Soy Sauce

Brisket Tips by Andrew Plaza:
"I think most people overthink cooking a brisket. It’s earned a reputation as the ultimate barbecue challenge. For this recipe, I’ll be simplifying the process for you, and sharing all the tips and tricks I’ve picked up after cooking briskets in my own backyard and in competition.
I’ve learned along the way you can achieve great results cooking a brisket hot and fast, despite the fact that it's typically done with the "low and slow" method:
- Trim the brisket when it is cold. Get to it as soon as you remove it from your fridge. Work swiftly, but be careful.
- First, you need to remove the harder fat, which you can tell by feel. The fat you need to remove will feel denser than the meat itself. It will not render down during the cooking process, so get rid of it.
- The softer and creamier textured fat that you find all over the brisket should be trimmed down slightly. I personally tend to remove most of it, if not all of it, because I do have access to plenty of higher-grade brisket. This has a lot of intramuscular fat that breaks down during the cooking process and helps keep my briskets moist and tender - we like this kind of fat.
- If you are cooking a brisket with less intramuscular fat, you may want to leave a little more fat on when trimming.
- Trim any fat with small slices because you can always cut off more if needed, but you cannot put it back once it is cut off. Remember, always use a sharp knife, especially with this.
- I know there is a lot of information out there about leaving some fat cap on, whether it is the bottom or the top. Most people recommend leaving around 1/4″ of fat, but I personally do not. I like to season the meat, not the fat, so off it comes. Lastly, once I’m happy with the amount of fat removed, I’ll neaten up the edges, by removing any straggling thin edge pieces that'll dry up after a long cook.
- I also like to round off any corners, making the brisket more aerodynamic for the heat and smoke to roll around more smoothly during the long cook.
- I suggest keeping the leftover trim of meat and some of the nice hard fat, break it down, then grind it for brisket burgers (there'll be a recipe on this coming in the new year).
- If you do want to go down the path of injecting the brisket, keep it simple (like our recipe). Using broth will give you a nice natural flavour. Don’t get caught up into "adding too much flavor" in your brisket injection for a backyard cook. Instead, allow the real beefy flavor of the meat and broth to shine through.
- There’s no rule against separating the point and flat before cooking them. The main reason to do so would be if you plan on making burnt ends. If this is the case, then separate the two muscles. If not, then it’s best to keep the whole brisket as one and cook it up.
- I find some people love the leaner flat slices of brisket while others tend to like the fatty point end slices, especially when you have a high-end brisket. That fat flavor is so intense when combined with the natural strong beefy flavor from the brisket.
Preparing Your Brisket - Trim:
TIP 1: Look at your brisket. You’ll see a large layer of fat (called the fat cap) across the top of your brisket. Flip it over and you’ll see mostly exposed meat with some silver skin and another large knob of fat. The long, thin, rectangular side of the brisket is your flat. The other, angular end of the brisket is your point.
TIP 2: Trim the underside of your brisket. Flatten the brisket and prep it for a more even smoke session (meaning good bark all the way around).
TIP 3: Now remove the fat. Using your hand, work your fingertips into the inside edge of that fat, lift it up while you slide your knife in between the brisket and the fat.
TIP 4: Once you’ve removed the amount of fat you're happy with, decide if you want to separate the point from the flat. This time, I separated this Christmas brisket because I want two separate types of dishes.
TIP 5: Square the brisket. Start by trimming a long thin section off of each side to square off your brisket. Once your sides are smooth and uniform, move to the ends. Trim off any excess or loose pieces of meat or fat that could burn during the cooking process.
TIP 6: Trim the skin and remaining fat and trim the fat cap. I have removed mostly all fat, as I will be injecting and wanting a leaner meat cut.
Directions for Brisket Injection:
STEP 1: Combine all ingredients to blender, and blend to combine. It will become frothy, so let the mixture rest at room temperature for 10 minutes.


STEP 2: After waiting, you should now be able to fill your injector. To fill the injector/syringe, submerge the needle into the liquid and pull back the plunger until the vial is full.

STEP 3: Inject the meat. Lay the trimmed brisket flat in a shallow baking dish or cooking tray. Insert the injector’s needle into the center point of the meat and slowly push down on the syringe while withdrawing the needle until a small amount of liquid leaks out at the surface.

STEP 4: Repeat this process across the entire brisket, moving along the meat’s grain. Leave about 1–2 inches between each insertion point. Once you’ve finished injecting the meat, pour any leftover marinade over the meat.

STEP 5: Wrap brisket in tin foil and place in refrigerator for at least 8 hours.

Directions for Brisket (on charcoal):
STEP 1: Start by lighting up a full chimney starter with lump charcoal. Once it's fully lit, place this on top of unlit charcoal in your grill. You want to get your grill in the 275°F – 300°F range.


STEP 2: Put two chunks of Cherry and Hickory Wood around the lit charcoal. It may start to create a white smoke (initial smoke), so this is the time to prep your brisket to allow your grill to settle into temperature and burn off the initial smoke.
Helpful Blog Post: Charcoal BBQ Tips: What is White Smoke vs. Blue Smoke?

STEP 3: Put the deflector over top of the charcoal and place a tin pan with warm water on top of the deflector to allow the water to come to temperature naturally. (Make sure you watch the water levels for the cook, and top up if needed.)

STEP 4: Pull the brisket out of the fridge, place on a clean surface and pat dry with paper towel to remove any excess injection. Then, get your sauces and spices ready!

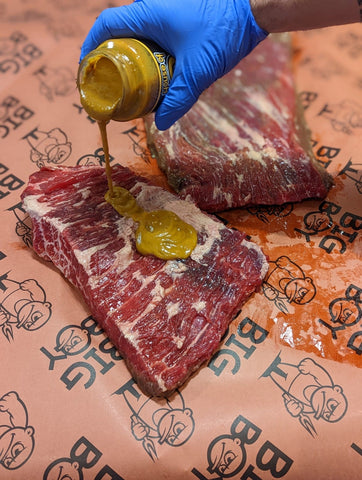
STEP 5: Now liberally apply House of Q Slow Smoke Gold to all exposed areas of the brisket.


STEP 6: Apply your first layer of Motley Que Beef Fix.


STEP 7: Apply your second layer of seasoning, Killer Hogs – The BBQ Rub.

STEP 8: Apply your third layer of seasoning, Heath Riles Pecan Rub.

STEP 9: Let sit for 10 minutes and then carefully carry and place onto your grill.


STEP 10: Smoke until internal temperature hits 165°F (usually takes between 3.5 to 4.5 hours).
Featured Thermometer: Brander Scroll Control Digital Thermometer

STEP 11: Remove from grill and place it in an aluminum pan. Pour ¼ cup of beef broth into pan and foil the top tightly.
STEP 12: Return to grill and cook, after an hour, start probing to check it's readiness. You want the temperature probe to enter like you're poking into room temperature butter. You will be looking for tenderness (each brisket will finish differently, some early, some late). The ideal temperature is 205°F, once you hit 195°F you will want to probe every 10 minutes or so until you hit your temperature, or the thermometer is going in like butter in all areas.


STEP 13: After you hit temperature, let your brisket rest for at least 1 hour. Remove your smoked brisket from the grill and wrap with two heavy duty, tin foil pieces. Next, wrap with a towel and put in an insulated cooler or place in tray into a Cambro or another insulated box. If your brisket is done earlier than expected, you can rest your brisket in a cooler with towels to keep it hot for several hours.


STEP 14: Once your brisket has rested, it is time to slice and serve. Separate the point from the flat and slice the meat against the grain.


Side Dish #1: Loaded Potato Salad
Ingredients:
- 2 ½ lbs. red potatoes
- Duck Fat Spray
- 4 tbsp Cattleman’s Grill Trail Dust All-Purpose Seasoning
- 12 oz or 8 slices thick sliced bacon
- 4 Green Onions
- ¼ cup Cheese Curds, diced
- ¼ cup Feta, crumbled
- 6 Eggs

Ingredients for Ranch Style Dressing:
- ½ cup Sour Cream
- ½ cup Mayonnaise
- 1 tbsp Dijon
- 1 tbsp Hot Sauce
- ¼ cup Fresh Parsley, minced
- 1 tbsp Fresh Chives, minced
- 1 tbsp Fresh Baby Dill, minced
- Black Pepper, fresh ground, to taste

Directions for Loaded Potato Salad:
STEP 1: Preheat your trusty grill to 375°F.
STEP 2: Fill a pot with your diced potatoes and fill with enough water to cover all the potatoes.


STEP 3: Bring the pot to a boil. Reduce heat, but maintain a simmer. Cook until tender when pierced with a fork, which should take about 30 minutes. Remove the potatoes from the water and cool.

STEP 4: Fill a pot with water and bring to a boil, add in your eggs and cook for 12 minutes. Once done, cool under cold running water for about 5 minutes. Let them sit in cold water until ready to peel and dice.


STEP 5: Grab the T-Topper and give it a light oil with Duck Fat Spray, place to the side for now.
STEP 6: Lay out the bacon on a wire jerky rack over a sheet pan. Transfer the pan to the grill. Cook the bacon on half of the grill, over gas burners (medium heat). Cook until the bacon is rendered and crisp. This should take about 20-30 minutes.

STEP 7: Remove bacon from the rack and place on paper towels to soak up the excess bacon fat. After it's cooled down, dice the bacon into into ¼ " thick pieces.
STEP 8: When the potatoes are cool enough to handle, cut the potatoes in half. Place in a mixing bowl and spray with Duck Fat Spray, season with Cattleman’s Grill Trail Dust and place onto T-Topper grill pan cut side down.

STEP 9: Place on grill and cook until skin is light crisped/charred.


STEP 10: Remove your potatoes from your grill and let them cool.
STEP 11: In a mixing bowl, combine the grilled potatoes, diced green onions, diced eggs, diced bacon, cheese curds, and crumbled feta. Toss and mix well, then pour the Ranch Style Dressing over the mixture and stir lightly until well combined.

STEP 12: Serve at room temperature or transfer to refrigerator to serve cold later.
Directions: Ranch Style Dressing
STEP 1: Combine all ingredients listed above in small bowl and whisk well.

Side Dish #2: Grilled Corn Salad
Ingredients:
- 2 cans (7 oz each) Niblets Corn (drained)
- 2 tbsp Butter
- 8–10 slices Bacon (cooked and crumbled)
- ½ cup Red Onion (diced)
- 2 Jalapeños (diced fine)
- 1 cup Cheddar Cheese shredded
- ½ cup Sour Cream
- ½ cup Cream Cheese
- 1 tsp Cattleman’s Grill 8-Second Rub
- 1 tsp Hardcore Carnivore Red

Directions for Grilled Corn Salad:
STEP 1: Prepare charcoal grill to 300°F.
STEP 2: Lightly spray Pan Pal grill pan with Duck Fat Spray, place the corn in the pan and add butter on top to melt.


STEP 3: Once butter is melted, season with Cattleman’s Grill 8 Second Rub and Hardcore Carnivore Red, then cook until slightly browned/charred. Once done, remove, and let sit.


STEP 5: Now mix sour cream and cream cheese until smooth. Add in the onion, bacon, jalapeno, and mix well.


STEP 6: Fold in corn and top if off with green onion.

Dessert: Cinnamon Apple Crumb Cake
Ingredients for Crumb Topping:
- ½ cup butter, melted (see Side Note below)
- ½ cup chopped California Walnuts
- 1 ¼ cup all purpose flour
- ⅓ cup light brown sugar
- ⅓cup granulated sugar
- 2 tsp cinnamon

Ingredients for Cake:
- 2 cups all purpose flour
- 2 tbsp Health Riles Cherry Rub
- 1 tsp baking powder
- ½ tsp baking soda
- ½ cup butter, room temperature (see notes)
- ¾ cup granulated sugar
- 1 tbsp vanilla extract
- 3 large eggs
- ¼ cup Greek yogurt
- 2 tbsp milk
- 2 medium apples, quartered, cored and thinly sliced (such as Granny Smith and Pink Lady

Directions for Cake:
STEP 1: Pre-heat oven to 350°F with a rack in the middle of the oven.
STEP 2: Spray 9” inch spring form pan with cooking spray and set aside
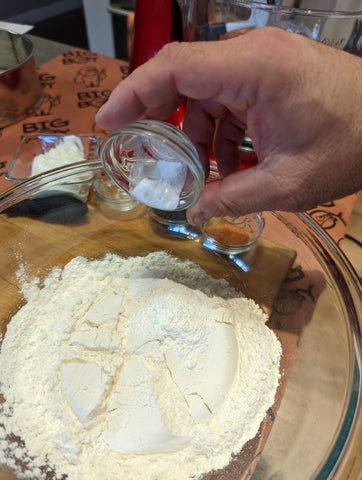
STEP 3: In a medium bowl, whisk together the flour, cherry rub, baking powder, and baking soda. In the bowl of an electric mixer, beat the butter for 2 minutes until it's light and fluffy.
STEP 4: Add the sugar and vanilla and continue to beat for an additional 1-2 minutes.
STEP 5: Add the eggs, one at a time until each is incorporated before adding the next.
STEP 6: Stop the mixer and scrape down the sides. With the mixer on low speed, add the dry ingredients in three editions alternating with the Greek yogurt the first time and milk the second time.

STEP 7: Do not overmix. The batter with be quite thick and it's okay if it has a few lumps.
STEP 8: Spread the batter into the prepared pan. Top with the sliced apples followed by the crumb topping and bake for 45-55 minutes or until a skewer or toothpick inserted in the center of the cake comes out clean.


STEP 9: Let cool for 15-20 minutes before removing from springform pan.
Side Note: I like to use salted butter for most of my baking. If you're using unsalted butter, add in ¼ teaspoon of salt for BOTH the crumb topping and the cake batter. I suggest using a 9-inch springform pan for this recipe as it makes it so much easier to get the cake out.


Cocktail: Grilled Paloma
Ingredients for Simple Syrup:
- ½ Cup granulated sugar
- ½ Cup water
Ingredients for Paloma:
- 2 Whole Grapefruit (halved)
- 1 oz Simple Syrup (recipe included)
- 5 Cinnamon sticks
- 3 oz. reposado tequila
- 1 oz. lime juice
- Grilled Lime for Garnish

Directions for Simple Syrup:
- Add the sugar and water to a small saucepan over medium heat.
- Stir until sugar is dissolved.
- Let cool, then pour into a glass jar and seal tightly with a lid.
- Simple syrup will keep for a month, if refrigerated.
Directions for Paloma:
STEP 1: Pre-heat grill to 350°F.
STEP 2: Cut 2 grapefruits in half. Place a cinnamon stick in each grapefruit half and glaze with simple syrup.

STEP 3: Place on the grill grate and cook for 20 minutes or until edges start to burn and it acquires grill marks. Do this for halved limes as well.


STEP 4: Remove from heat and let them cool down.
STEP 5: After grapefruit has cooled, squeeze and strain juice.


STEP 6: In a mixing glass, add tequila, lime juice, simple syrup, and 3-4 ounces of the grilled grapefruit juice.


STEP 7: Add ice and shake. Strain over ice in an old-fashioned glass.
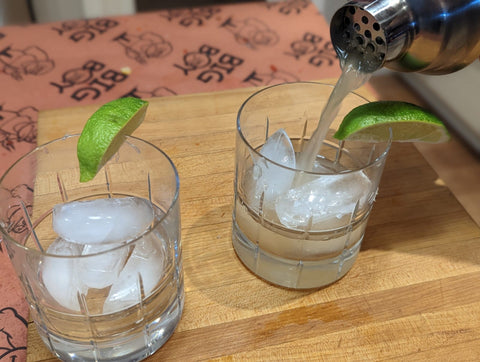
STEP 8: Add a grilled lime slice and cinnamon stick to garnish.
STEP 9: Cheers!

A fan of these recipes? Post your photos and tag us on Instagram @BarbecuesGalore so we can share your creations too!
Are you a cheese lover? Here are some cheesy barbecue recipes try:
- Barbecued Philly Cheesesteak Recipe
- Loaded Potato Chip Nachos Recipe
- Barbecued Scalloped Potatoes Recipe
Recipe written by competitive barbecue pitmaster, Andrew Plaza. Follow him on Instagram for more barbecue goodness by clicking here.

Like this blog post AND getting deals on barbecue necessities, including thermometers? Subscribe to our Hotline Newsletter to be the first to receive updates on limited time deals and exclusive monthly recipes.


